Introduction
With the creation of multiple apps, it’s getting a bit complicated with all the credentials I need to add to my password manager, and I wanted a way to have just one login for all of them.
VM Host / Setup
To keep the authentications separated from my home environment in case anything goes down, I run it with Racknerd. To find a cheap VM, use this tracker site.
VM Specs
I ended up going with a 2 V-core VM with 2GB RAM running Ubuntu 22.04
Docker Install
Docker Engine
run the following one line at a time to install Docker as an apt repo
# Add Docker's official GPG key:
sudo apt-get update
sudo apt-get install ca-certificates curl gnupg
sudo install -m 0755 -d /etc/apt/keyrings
curl -fsSL https://download.docker.com/linux/ubuntu/gpg | sudo gpg --dearmor -o /etc/apt/keyrings/docker.gpg
sudo chmod a+r /etc/apt/keyrings/docker.gpg

# Add the repository to Apt sources:
echo \
  "deb [arch=$(dpkg --print-architecture) signed-by=/etc/apt/keyrings/docker.gpg] https://download.docker.com/linux/ubuntu \
  $(. /etc/os-release && echo "$VERSION_CODENAME") stable" | \
  sudo tee /etc/apt/sources.list.d/docker.list > /dev/null
sudo apt-get update
After the Repo has been added, run the following to install Docker.
sudo apt-get install docker-ce docker-ce-cli containerd.io docker-buildx-plugin docker-compose-pluginDocker Compose
Install compose with the following
sudo curl -L "https://github.com/docker/compose/releases/download/1.26.0/docker-compose-$(uname -s)-$(uname -m)" -o /usr/local/bin/docker-composethen change the permission of the binary to allow it to execute
sudo chmod +x /usr/local/bin/docker-composeyou can check if it is successfully installed and executable with the following docker-compose --version
# docker-compose --version
docker-compose version 1.26.0, build d4451659
Installing Authentik
Folder Setup
Create the following folder structure in your VM
.
└── .docker/
    └── compose/
        └── authentik
Docker Compose File
After navigating into the folder you can download the premade docker-compose file from authentik with this wget https://goauthentik.io/docker-compose.yml
Authentik Configuration
You will need to make a password and a secret key to secure authentik and install pwgen to make it easier to generate them from the console
sudo apt-get install -y pwgenrun the following to generate them both and save them in a file called .env
echo "PG_PASS=$(pwgen -s 40 1)" >> .env
echo "AUTHENTIK_SECRET_KEY=$(pwgen -s 50 1)" >> .env
# Because of a PostgreSQL limitation, only passwords up to 99 chars are supported
# See https://www.postgresql.org/message-id/09512C4F-8CB9-4021-B455-EF4C4F0D55A0@amazon.com
To start the service, run the following
docker-compose pull
docker-compose up -d
As this is a remote VM, one way to access the initial setup page is by port tunnel over SSH
ssh -L 9000:VMIP_URL_HERE:9000 root@VMIP_URL_HEREInstalling Nginx Proxy Manager
Folder Setup
Create the following folder structure in your VM
.
└── .docker/
    └── compose/
        └── NPM/
            ├── data
            └── letsencrypt
Docker Compose
for the Docker compose file, use the following
version: '3.8'
services:
  npm:
    image: 'jc21/nginx-proxy-manager:latest'
    restart: unless-stopped
    ports:
      - '80:80'
      - '81:81'
      - '443:443'
    volumes:
      - ./data:/data
      - ./letsencrypt:/etc/letsencrypt
Run the docker container with docker-compose pull and `docker-compose up -d’
Docker Networking
One thing that you may have noticed is that Docker is running two different networks for both instances. To make NPM easier to communicate with Authentik without using the local IP and instead using a hostname, add the following to the end of NPM’s Docker compose file.
networks:
  default:
    external:
      name: authentik_default
Recreate the container with `docker-compose up -d’
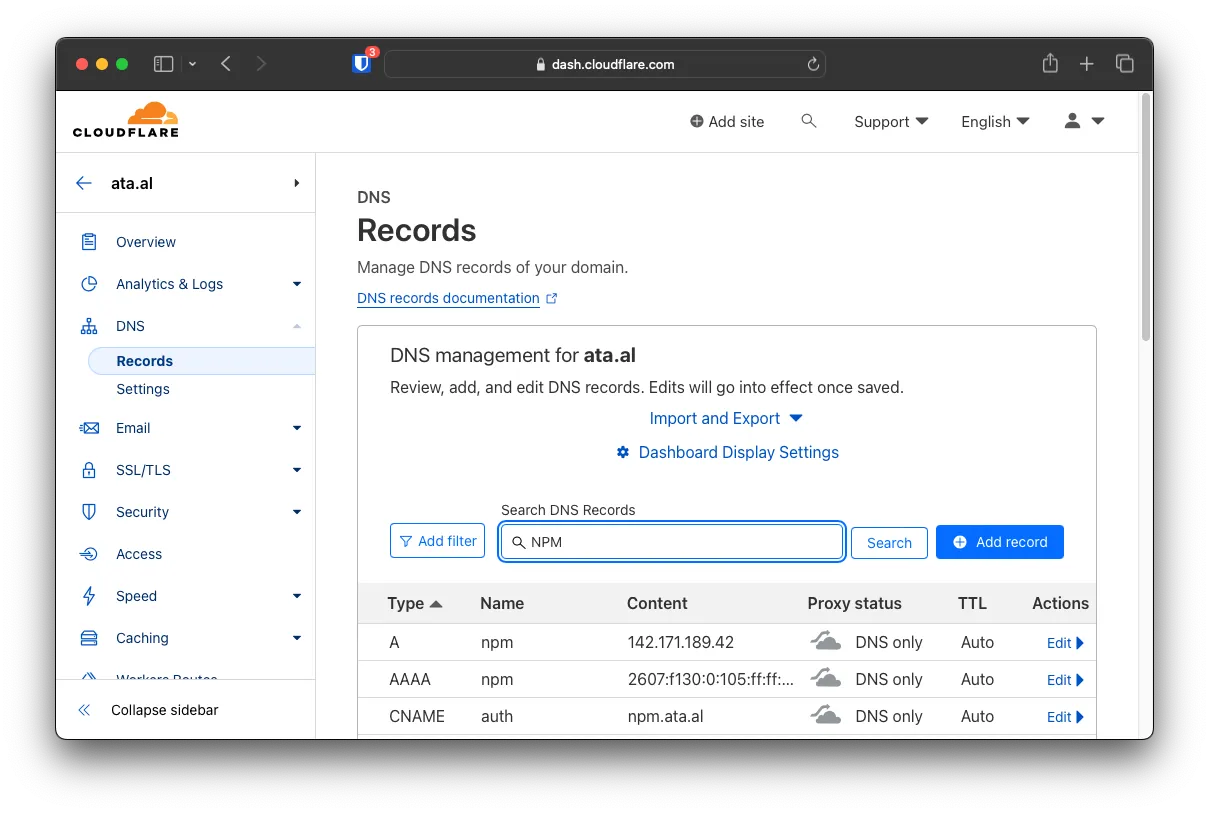
Cloudflare Domain Setup
Create an A and a AAAA record for the NPM instance. For Authentik, you can use a CNAME back to NPM
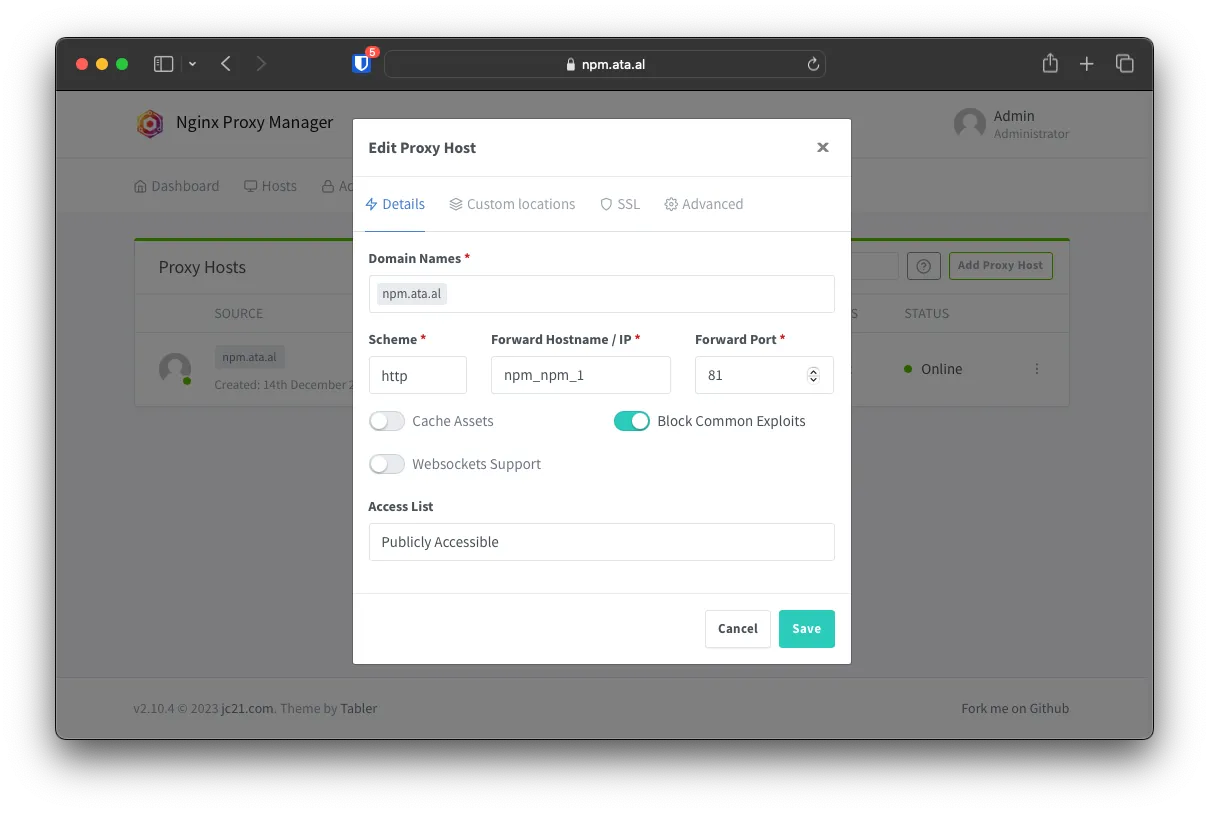
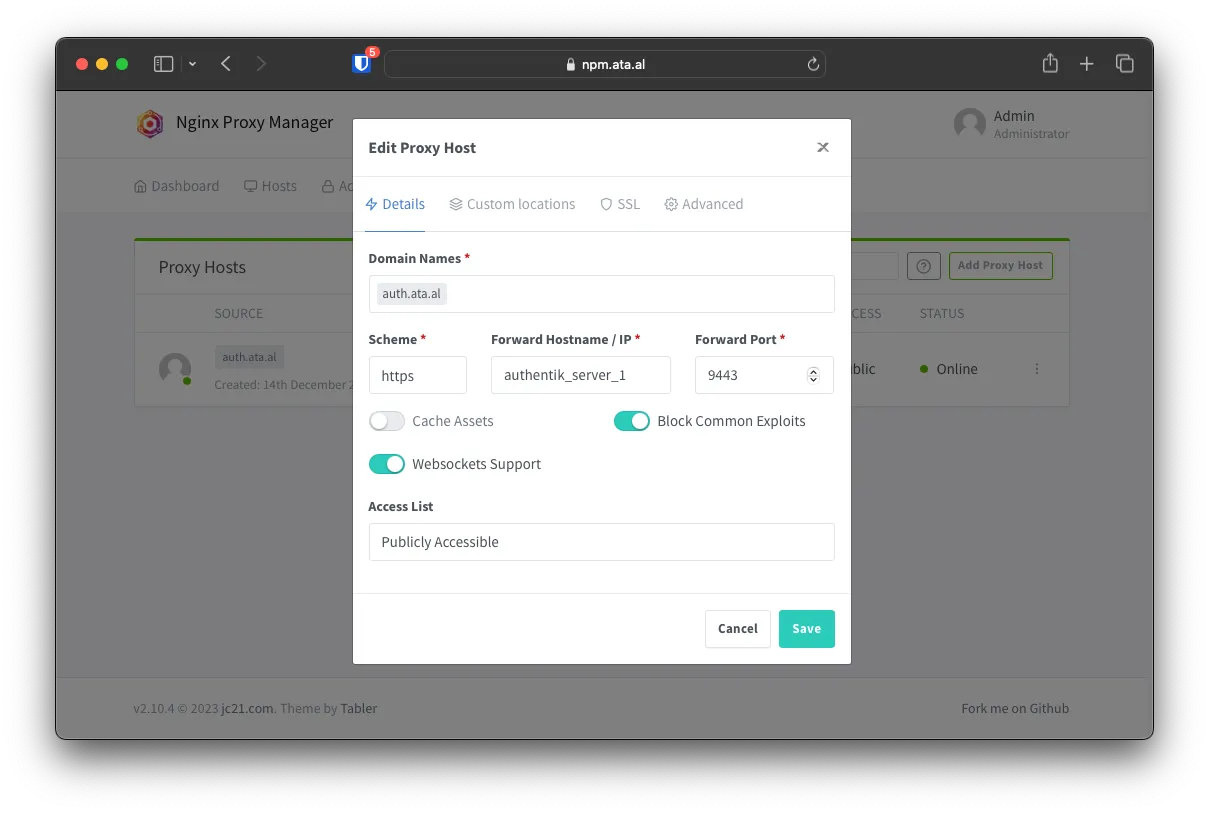
NPM Subdomain Setup
Add two new proxy hosts with the Docker Hostname and the correct ports like the following